How to Split an Image in Half (Step-by-Step Guide + How It Works)
Splitting an image in half sounds simple—and it is—but once you understand how it works, you can use it for a lot more than just cutting a photo into two pieces. People use this for social media posts, before/after comparisons, printing, design layouts, and even creative storytelling.
Let’s break it down in a clear, practical way so you can actually do it yourself without confusion.
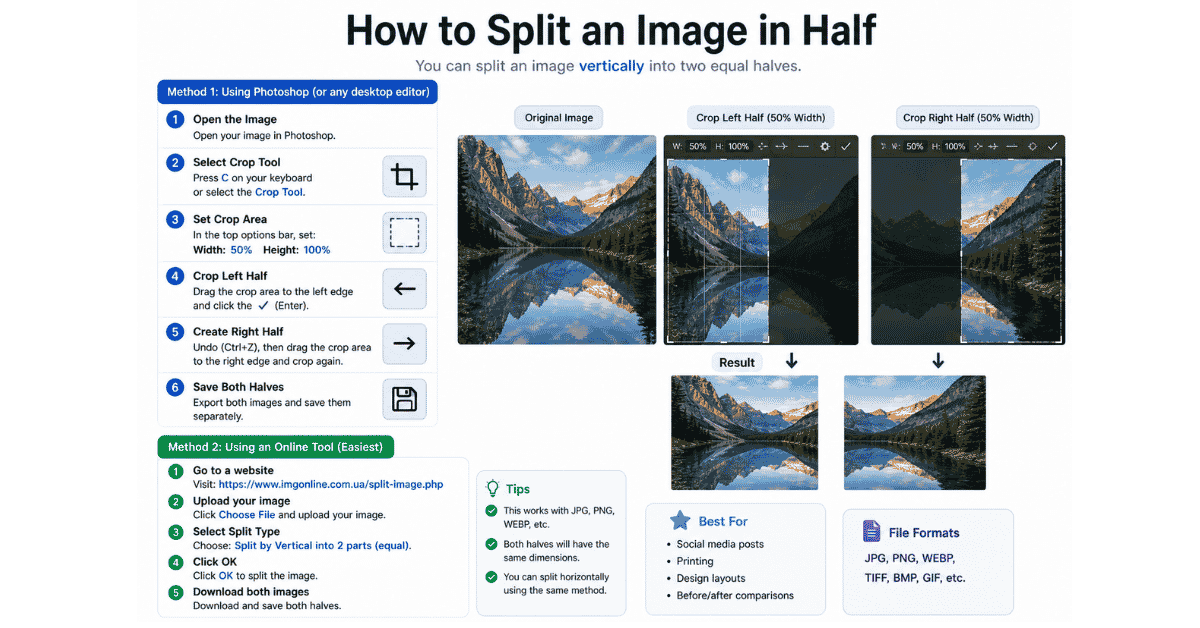
Method 1: Using an Online Image Split Tool (Easiest Way)
This is the method you were already looking at in your screenshot. Tools like that are made exactly for this purpose.
Step-by-step:
- Upload your image
- Click “Upload” or drag and drop your image.
- Choose split type
- Select:
- Grid (for multiple parts)
- Horizontal (top & bottom)
- Vertical (left & right)
- Select:
- Set rows and columns
- For splitting in half:
- Vertical split → Columns = 2, Rows = 1
- Horizontal split → Rows = 2, Columns = 1
- For splitting in half:
- Adjust the blue line
- You’ll see a line in the middle.
- You can drag it if needed (for custom split).
- Click Generate
- The tool creates two separate images.
- Download your images
- Either download individually or as a ZIP file.
Why this method is best
- No software installation
- Works in seconds
- Clean and accurate split
- Beginner-friendly
If you want to Split your image. Try the Image Split Tool.
Method 2: Using Photoshop (More Control)
If you want more precision or you’re doing design work, Photoshop gives better control.
Steps:
- Open your image in Photoshop
- Select the Slice Tool
- Right-click → choose Divide Slice
- Set:Vertical split → 2 columns
Horizontal split → 2 rows - Export using Save for Web
You’ll get two perfectly split images.
Method 3: Using Canva (Simple + Online)
If you already use Canva, you can do it there too.
Steps:
- Upload your image
- Add it to your canvas
- Duplicate the image
- Crop each copy:
- First → left half
- Second → right half
- Download both images separately
It’s not automatic, but it works well.
Method 4: Using Mobile Apps
If you’re on your phone, apps like:
- PicsArt
- Snapseed
- Photo Editor
can do this.
Basic idea:
- Duplicate image
- Crop each half manually
- Save both parts
Let’s Talk About How It Actually Works
Here’s the part most people skip—but it’s important.
An image is basically made up of pixels arranged in width and height.
For example:
- Width = 1200 pixels
- Height = 800 pixels
Vertical split:
- Left image = 600 × 800
- Right image = 600 × 800
Horizontal split:
- Top image = 1200 × 400
- Bottom image = 1200 × 400
So when you “split” an image, the tool is simply dividing pixel values into equal parts.
That’s all that’s happening behind the scenes.
What Does “Splitting an Image in Half” Mean?
At its core, splitting an image means dividing one picture into two equal parts.
You can do this in two main ways:
Vertical split → left side + right side
Horizontal split → top half + bottom half
That’s it. But the way you do it depends on the tool you’re using.
Why You Might Want to Split an Image
This isn’t just a random feature. There are real use cases.
1. Social Media Design
Instagram carousel posts often use split images for swipe effect.
2. Before & After Comparisons
Great for:
- Fitness transformations
- Photo editing
- Product improvements
3. Printing
Large images are often split into parts for printing on multiple pages.
4. Website Layouts
Designers split images to fit sections of a webpage.
5. Creative Designs
Split visuals can create interesting effects or storytelling.
Common Mistakes (And How to Avoid Them)
Let’s keep it real—this is where most people mess up.
1. Wrong Dimensions
If your image size isn’t even, splitting can create uneven parts.
Fix: Resize image first (e.g., 1200 × 628 works well)
2. Cropping Instead of Splitting
Cropping removes part of the image. Splitting keeps everything—just divided.
3. Losing Quality
Some tools compress images.
Fix: Always choose:
- PNG (better quality)
- High quality export
4. Misaligned Split
If you manually drag lines, it might not be exactly center.
Fix: Use fixed grid settings when possible.
Pro Tips (Make It Look Clean)
Here’s what actually makes your result look professional:
- Use even dimensions (e.g., 1200 width → splits cleanly into 600 + 600)
- Keep important content centered before splitting
- Use guidelines when editing manually
- Export in high resolution
Quick Comparison of Methods
| Method | Difficulty | Speed | Control |
|---|---|---|---|
| Online Tool | Very Easy | Fast | Medium |
| Photoshop | Medium | Fast | High |
| Canva | Easy | Medium | Medium |
| Mobile Apps | Easy | Medium | Low |
Conclusion
Here’s the thing, splitting an image in half is simple, but knowing how to do it properly saves time and avoids messy results.
If you just want a quick result, use an online splitter like the one in your screenshot. Set rows or columns to 2, hit generate, and you’re done.
If you’re working on design projects, go with Photoshop or Canva so you can control exactly how everything looks.
What really matters is understanding that you’re just dividing pixels evenly. Once that clicks, you can split images in any way you want—not just in half.
If you want, I can take your image and split it for you exactly (horizontal or vertical) and give you the final files.