How to Reduce the MB of an Image Without Losing Quality
We have absolutely all been there. You are sitting at your computer trying to upload a brand new profile picture, attach a crucial document photo to an important work email, or submit a picture to a government website. You click upload, wait a few seconds, and boom you are hit with a giant, frustrating error message right in the middle of your screen: “File size too large” Today’s digital cameras and modern smartphones take absolutely stunning, professional photos. But those high-quality, detailed shots come with a very real hidden cost.
They take up a massive amount of digital storage space. A single unedited photo straight from a newer iPhone or Samsung Galaxy can easily range from 5 MB to 15 MB, and sometimes even more if you are shooting in higher resolutions. If you are dealing with this exact, annoying headache right now, you are probably wondering how to reduce mb of image files quickly so you can just get on with your busy day.
The Big Problem with Massive Image Files
People upload or share photos without thinking about file size. Large images can cause several problems online and offline. That’s why reducing image size has become a common and important practice for bloggers, businesses, designers, and everyday internet users.
There are a few major reasons why people prefer smaller image files:
- Faster Website Speed
Large images can significantly slow down a website. When pages take too long to load, visitors often leave within seconds. Smaller images help websites load much faster, improve user experience and can even help with search engine rankings. - Better Storage Management
High-resolution photos take up a lot of space on phones, tablets and computers. By resizing or compressing images, you can store thousands more photos without constantly running out of storage. - Easier File Sharing
Most email services and messaging platforms have strict limits on attachment sizes. Large images may fail to upload or send. Smaller image files make it easy to share photos through email, social media, or messaging apps without any issues.
How to Reduce Size of Image from MB to KB
If you want to know exactly how to resize image from mb to kb, you first need to understand what those random letters actually mean. MB stands for Megabytes, which represents a large, heavy digital file size. KB stands for Kilobytes, which represents a much smaller, lightweight file size. There are exactly 1,000 Kilobytes inside a single Megabyte.
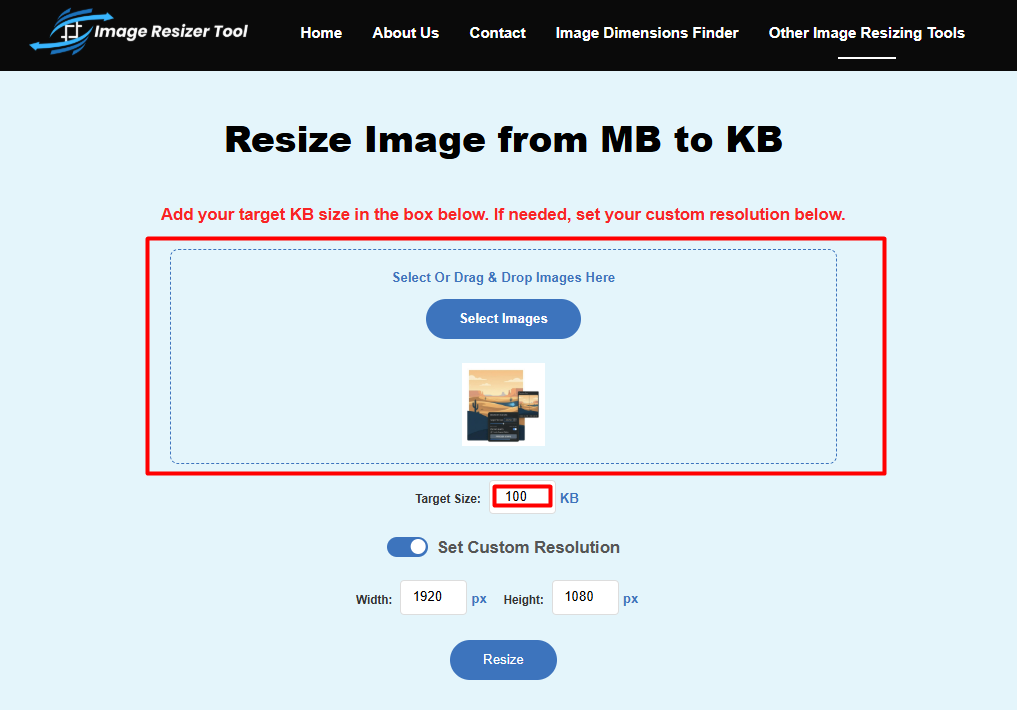
The absolute easiest, fastest and free way to do this is by using a free, online tool like Imageresizer.tools. Here is exactly how you can do it in just a few seconds, without needing to install anything on your hard drive:
Step 1: Open Your Web Browser
Head over to Convert Image from MB to KB Online Free tool on Imageresizer.tools header or footer section on your computer, laptop or mobile phone. Best part about using a web based tool is that you don’t have to download any heavy, virus apps or sign up for an annoying account that sends you spam emails.
Step 2: Upload Your Heavy Photo
Click on the main, clearly marked upload button and pick the massive photo you want to shrink in kb directly from your files. If you are on a desktop computer, you can even just drag and drop the image file right onto the center of the webpage.
Step 3: Choose How Small You Want It
The tool will give you simple, easy-to-understand options to reesize the image. You can add a specific target file size in kb depending on what you exactly need.
Step 4: Download Your New File in JPEG format
Hit the resize button on the screen. Within two or less seconds, you will then get a quick prompt to download your brand new, much smaller KB file.
It really is that simple. The website handles all the complicated math and coding behind the scenes while you just click a button.
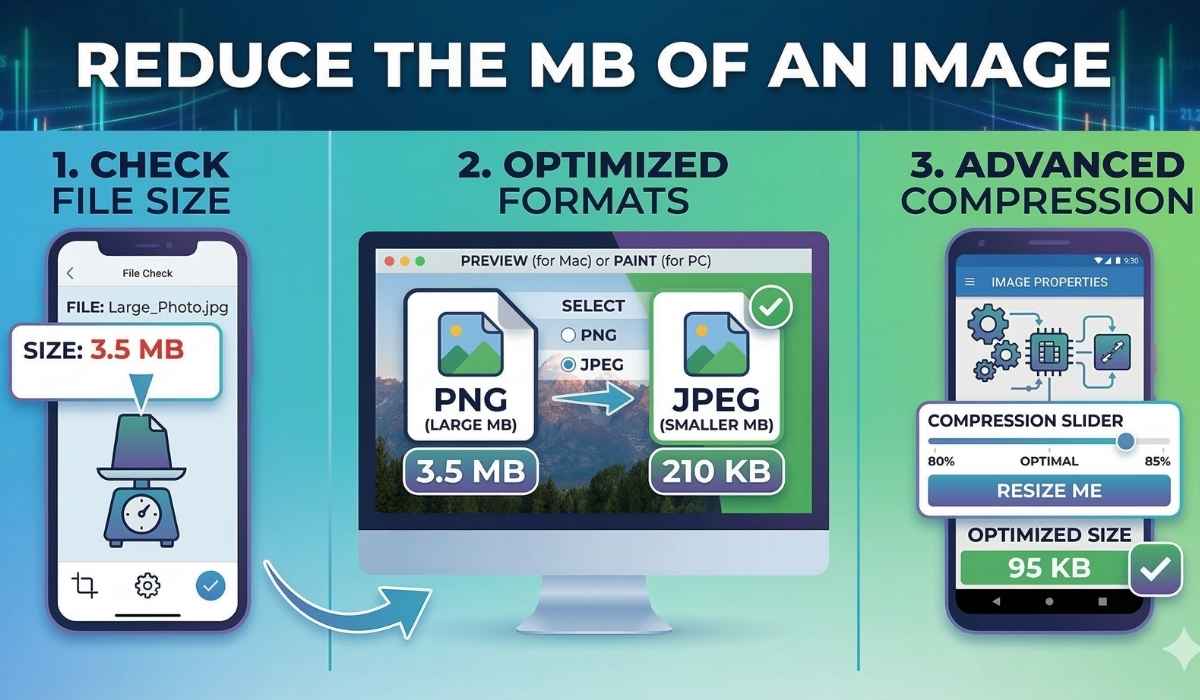
Why You Need to Reduce MB of JPEG Image Files
You have probably noticed over the years that the vast majority of your digital photos end in “.jpg” or “.jpeg”. JPEG is by far the most popular and widely used image format in the entire world. Because it already does a pretty fantastic job of keeping file sizes somewhat manageable while keeping the colors rich and the details looking great.
If you specifically need to know how to reduce mb of jpeg image files, the overall process is incredibly straightforward. JPEGs handle the digital compression process extremely well. This means you can strip away an amount of file weight before a normal person would ever even notice a drop in the picture’s visual quality.
How to Reduce MB of Image in Android
Android smartphones are world-famous for taking incredibly crisp, vibrant, and highly detailed photos. But as mobile camera lenses get better and better every single year, the file sizes naturally get bigger and bigger, too. If you are out and about, sitting at a local coffee shop, and need to shrink a photo directly from your smartphone to post on social media or send to your boss, here is exactly how to reduce mb of image in Android.
Option 1: Use Imageresizer.tools in your Mobile Browser
Open the Google Chrome browser on your Android device and go straight to Resize Image from MB to KB tool in Imageresizer.tools. The website is completely mobile-friendly and super easy to tap with your fingers. Just tap to upload from your Android photo gallery, hit Resize, and download the smaller version right to your phone’s internal download folder in JPEG format.
Option 2: The WhatsApp Trick (A Quick Hack)
Here is a quick, slightly hacky trick if you are in a massive rush and need a small file immediately. When you send any photo through the WhatsApp messaging app, the app automatically compresses it behind the scenes to save mobile data. You can send the heavy photo to a trusted friend (or create a personal group chat where you are the only member) Then save that newly sent photo back to your Android gallery.
Option 3: Change Your Default Camera Settings
If you are totally tired of having to manually resize photos every single week, stop your Android from taking massive photos in the first place. Open your main Camera app, tap the little Settings gear icon usually found in the corner. Llook for options labeled “Picture Size,” “Resolution,” or “Format.”
Change it from the absolute highest premium setting (like 50MP, 108MP, or 200MP) down to a more standard 12MP. The pictures will still look totally amazing on Instagram or Facebook but they will take up way less permanent space on your device.
Pro Tips for Resizing Images
Making an image smaller is relatively easy, but making it smaller while keeping it looking pretty and professional takes a tiny bit of care. Here are some final pro tips to keep your digital memories looking sharp:
- Always Keep an Original Backup: Never, ever overwrite your original, high-quality photo if you can help it. Always save the resized version as a brand new file (for example, name it “vacation-photo-small.jpg”). If you ever want to actually print the picture, make a canvas, and put it in a frame in your living room, you will definitely want that big original file to ensure it prints clearly.
- Watch Out for Pixelation: If you compress a photo way too much, it will start to look blurry, blocky, and just plain awful. In the photography world, this is called pixelation. If you compress an image and it looks bad, don’t panic. Just delete it and try doing it again on the website, but with a slightly higher quality setting this time.
Now that you know exactly how to reduce mb of image files, you can handle those annoying “file too large” errors with total ease and confidence. Remember, you do not need to pay for fancy software to get this done. Bookmark Imageresizer tools on your computer desktop and your phone browser right now, so the next time you need to seamlessly shrink an image from MB to KB, you can get it done in just a few quick clicks.
Why Image Size Matters
Before resizing, it helps to know why “smaller is better” in the digital world:
-
Website Speed: Large images slow down load times. If a page takes more than three seconds to load, most visitors will leave.
-
Storage Space: High resolution photos eat up phone and cloud storage.
-
Easy Sharing: Email providers like Gmail often cap attachments at 20-25 MB.
Pro Tips for JPEG Files
Most photos use the .jpg or .jpeg format because it handles compression beautifully. To get the best results:
-
The 80% Rule: Set your quality slider to 80%. This usually cuts the file size in half, yet the human eye won’t notice a difference in quality.
-
Check Dimensions: Most web uploads don’t need billboard-sized resolution. Downsizing the width or height is the most effective way to drop MBs.
-
Keep an Original: Never overwrite your original file. Save the smaller version as a copy (e.g., “photosmall.jepg”) in case you ever need to print a high quality physical copy.
Frequently Asked Questions (FAQ)
Does reducing MB always reduce the quality?
Technically, yes, because data is being removed. However, using tools like Imageresizer.tools allows you to remove “invisible” data first, meaning the image looks identical to the naked eye while being significantly smaller.
What is the difference between Resizing and Compressing?
Resizing changes the physical dimensions (width and height) of the image. Compressing reduces the file size by optimizing the data within those dimensions. Doing both is the most effective way to save space.
Is it safe to upload my private photos to online resizers?
Most reputable tools, including Image resizer tool, process images locally or delete them from their servers shortly after processing. Always check the site’s privacy policy if you are handling sensitive documents.
Can I convert a PNG to a smaller JPEG?
Yes. PNG files are usually much larger because they support transparency. Converting a PNG to a JPEG via an online imageresizer.tool is one of the fastest ways to convert a file by 70% or more.