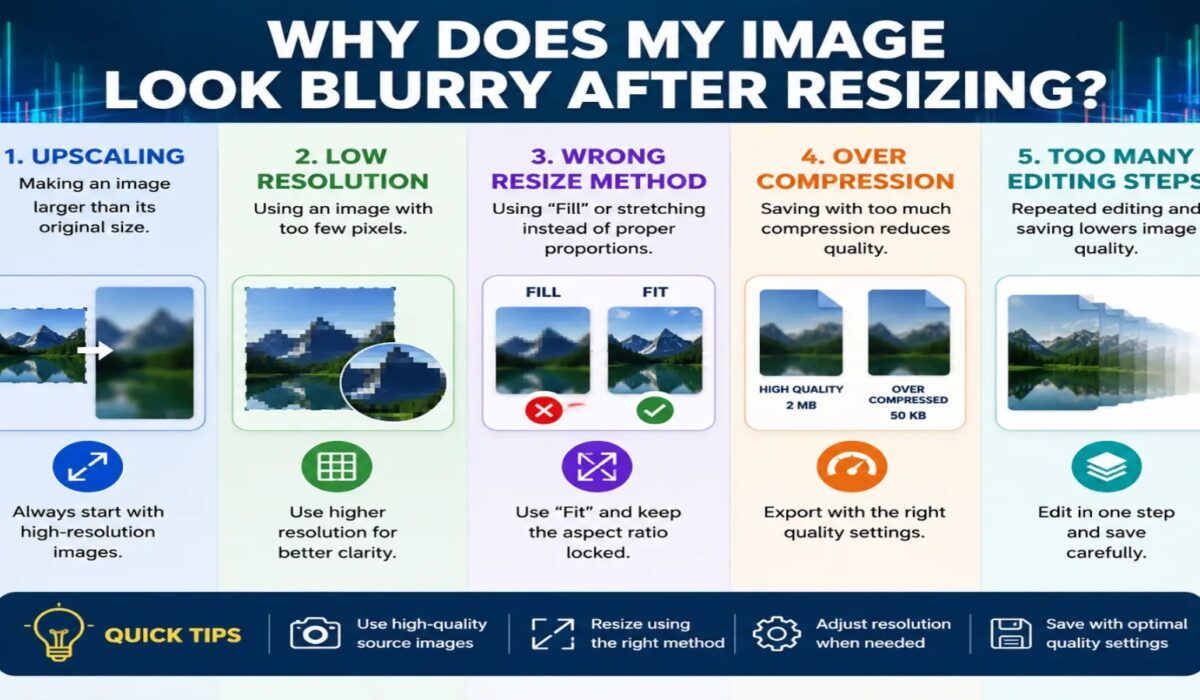
Why Does My Image Look Blurry After Resizing?
Have you ever resized an image only to discover that it suddenly looks blurry, pixelated, or less sharp than the original? This is one of the most common problems people encounter when editing photos, creating social media graphics, designing websites, or preparing images for printing.
At first glance, resizing an image seems simple. You upload a photo, change its dimensions, save it, and expect it to look the same. Unfortunately, image resizing is more complex than that. Every digital image contains a fixed amount of visual information, and changing its size can affect how that information is displayed.
Whether you are a photographer, designer, marketer, blogger, or business owner, understanding why images become blurry after resizing can help you maintain quality and create professional-looking visuals.
In this guide, we’ll explore the most common causes of blurry images after resizing and explain practical solutions to keep your images sharp and clear.
Understanding How Digital Images Work
Before discussing blur issues, it’s important to understand how digital images are created.
Every digital image consists of tiny squares called pixels.
Pixels contain color information and combine to form the image you see on your screen.
For example:
- A 1000 × 1000 pixel image contains 1 million pixels.
- A 4000 × 3000 pixel image contains 12 million pixels.
The more pixels an image contains, the more detail it can display.
When you resize an image, you change how those pixels are arranged and displayed.
This process can lead to quality loss if not handled correctly.
How ImageResizer.Tools Helps Maintain Image Quality
One of the most common frustrations when resizing images is losing sharpness. Many image resizing tools simply stretch or compress images without paying enough attention to quality, which can result in blurry photos, soft edges, and reduced detail.
At ImageResizer.Tools, image quality is a priority. The tool is designed to resize images while preserving as much detail as possible, helping users achieve cleaner and sharper results compared to many basic resizing tools available online.
Whether you’re resizing images for social media, websites, blogs, eCommerce stores, presentations, or digital marketing campaigns, ImageResizer.Tools makes the process fast and simple while focusing on maintaining visual clarity.
Key benefits include:
- Quick image resizing without complicated software
- Support for common image formats
- High-quality output for web and social media use
- Reduced quality loss during resizing
- Easy-to-use interface for beginners and professionals
- No need to install additional software
If you’ve experienced blurry images after resizing, ImageResizer.Tools can help you create properly sized images while maintaining better overall image quality for your projects.
What Happens When You Resize an Image?
Resizing means changing the dimensions of an image.
There are two main scenarios:
Making an Image Smaller
When reducing size:
- Pixels are removed.
- Fine details may disappear.
- Textures become softer.
Making an Image Larger
When enlarging:
- New pixels must be created.
- Software estimates missing details.
- Sharpness often decreases.
Image enlargement is usually the main reason images become blurry.
The Most Common Reason: Enlarging a Small Image
One of the biggest causes of blurry images is stretching a small image beyond its original size.
For example:
Original image:
- 500 × 500 pixels
Resized image:
- 2000 × 2000 pixels
The software now has to invent millions of additional pixels.
Since those pixels never existed, the program guesses what they should look like.
The result is often:
- Blur
- Soft edges
- Pixelation
- Loss of detail
This is similar to zooming into a screenshot. The more you enlarge it, the worse it looks.
Understanding Pixelation vs Blur
Many people confuse pixelation with blur.
Pixelation
Pixelation occurs when individual pixels become visible.
Signs include:
- Blocky appearance
- Jagged edges
- Visible squares
Blur
Blur occurs when details become soft.
Signs include:
- Fuzzy appearance
- Loss of sharp edges
- Reduced detail
Both problems often happen during resizing, especially when enlarging images.
Low-Resolution Images Create Problems
Image resolution plays a major role in quality.
A low-resolution image contains fewer pixels.
Examples include:
- Small screenshots
- Compressed images
- Social media downloads
- Images copied from websites
When resized, these images have limited information available.
As a result:
- Sharpness decreases
- Details disappear
- Blur becomes noticeable
Starting with a high-resolution image significantly improves resizing results.
Image Compression Can Cause Blur
Many websites automatically compress uploaded images.
Compression reduces file size by removing visual information.
Common examples include:
- Social media platforms
- Messaging apps
- Website builders
- Email attachments
When compressed images are resized later, quality loss becomes more noticeable.
You may see:
- Soft details
- Blurry textures
- Reduced sharpness
Repeated compression can make the issue even worse.
Incorrect Resampling Methods
When resizing images, software uses algorithms called resampling methods.
These algorithms determine how pixels are added or removed.
Different methods produce different results.
Nearest Neighbor
Fast but often produces jagged edges.
Bilinear
Creates smoother transitions but may appear softer.
Bicubic
Provides better quality and smoother details.
Lanczos
Often produces the sharpest results.
Choosing a poor resampling method can cause noticeable blur.
Professional editing software typically offers multiple options.
Saving Images Multiple Times
Each time a JPEG image is saved, some quality may be lost.
This process is called lossy compression.
For example:
- Download image.
- Edit image.
- Save image.
- Reopen image.
- Save again.
After multiple saves:
- Details disappear.
- Edges soften.
- Overall sharpness decreases.
The image may become blurry even before resizing occurs.
Social Media Platforms Reduce Quality
Many users notice that their images look sharp before uploading but blurry afterward.
This happens because social media platforms compress images automatically.
Popular platforms often:
- Resize images
- Reduce file size
- Optimize loading speed
As a result:
- Fine details may disappear.
- Text can become less sharp.
- Colors may slightly change.
Uploading images using recommended dimensions can help reduce these issues.
Why Text Looks Blurry After Resizing
Text is especially sensitive to resizing.
When text is enlarged:
- Edge definition decreases.
- Letters become softer.
- Small fonts lose clarity.
This is common when:
- Enlarging screenshots
- Scaling logos
- Resizing graphics
Vector-based designs usually handle resizing much better than raster images.
Raster Images vs Vector Graphics
Understanding the difference between raster and vector files is important.
Raster Images
Examples:
- JPG
- PNG
- GIF
Raster images use pixels.
When enlarged:
- Quality decreases
- Blur becomes visible
Vector Graphics
Examples:
- SVG
- AI
- EPS
Vectors use mathematical formulas instead of pixels.
When enlarged:
- Quality remains sharp
- No pixelation occurs
This is why logos are often created as vector files.
Incorrect Export Settings
Many resizing problems occur during export.
For example:
- Low-quality JPEG settings
- Excessive compression
- Small output dimensions
Export settings directly affect image clarity.
High-quality export settings usually produce better results.
DPI and Resolution Confusion
Many people believe DPI alone determines image quality.
DPI means dots per inch and mainly affects printing.
For digital images:
- Pixel dimensions matter most.
- DPI has little effect on screen quality.
For example:
A 2000 × 2000 pixel image remains the same on screen regardless of whether it is set to:
- 72 DPI
- 150 DPI
- 300 DPI
The actual pixel count is what determines visible detail.
Cropping Before Resizing
Cropping removes pixels from an image.
If you crop heavily and then enlarge the remaining portion:
- Detail decreases
- Sharpness suffers
- Blur becomes visible
This is common when zooming into a small area of a photo.
The more you crop, the less image data remains.
Screen Resolution Differences
Images can appear different depending on the screen being used.
Examples:
- Standard monitors
- Retina displays
- 4K screens
- Smartphones
An image that looks sharp on one screen may appear blurry on another.
High-resolution screens reveal imperfections more easily.
Why Screenshots Often Become Blurry
Screenshots are usually created at screen resolution.
When enlarged:
- Text softens
- Icons become fuzzy
- Fine details disappear
This happens because screenshots contain limited pixel information.
Using original files instead of screenshots often produces better results.
Over-Sharpening Can Create Problems
Many people try to fix blur by increasing sharpness.
Too much sharpening can create:
- Halos around objects
- Artificial edges
- Grainy appearance
Moderate sharpening works best.
Overdoing it can make images look unnatural.
AI Upscaling and Modern Solutions
Modern AI-based tools can enlarge images more effectively.
These tools analyze:
- Edges
- Textures
- Patterns
They then create additional detail using machine learning.
Benefits include:
- Improved sharpness
- Better enlargement quality
- Reduced blur
However, even AI cannot fully recreate details that were never present.
How to Prevent Blur When Resizing
Start with the Highest Resolution Available
Always use the original image whenever possible.
Higher-resolution files contain more detail.
Avoid Excessive Enlargement
Try not to enlarge images beyond their original dimensions.
Large increases often produce visible blur.
Use Professional Software
Programs like Photoshop offer advanced resizing options.
Better algorithms usually produce better results.
Choose the Correct File Format
Use:
- PNG for graphics and text
- JPG for photographs
Selecting the right format helps preserve quality.
Export at High Quality
Avoid extreme compression settings.
Higher-quality exports retain more detail.
Keep Original Files
Always save an unedited version.
This allows you to start fresh if quality problems occur.
Upload Correct Dimensions
Using platform-recommended sizes reduces automatic resizing.
This helps maintain image clarity.
Best Practices for Social Media Images
To reduce blur on social media:
- Use recommended image sizes.
- Upload high-resolution versions.
- Avoid repeated downloads and reuploads.
- Keep text large and readable.
- Save files at high quality.
These steps help preserve sharpness across platforms.
Frequently Asked Questions
Why is my image blurry after making it larger?
Because the software must create additional pixels that were not present in the original image. This often reduces detail and sharpness.
Can blurry images be fixed?
Sometimes. Sharpening tools and AI upscaling software can improve quality, but they cannot fully restore lost details.
Does PNG prevent blur?
PNG helps preserve image quality better than heavily compressed JPEG files, especially for graphics and text.
Why does Facebook make my image blurry?
Facebook compresses uploaded images to reduce file size and improve loading speed.
What is the best way to resize images?
Start with a high-resolution original image, use quality resizing software, and export using high-quality settings.
Final Thoughts
If your image looks blurry after resizing, the problem usually comes down to pixel limitations, enlargement beyond the original size, compression, or incorrect export settings. Every digital image contains a fixed amount of visual information, and resizing changes how that information is displayed.
The best way to maintain image quality is to start with high-resolution files, avoid excessive enlargement, choose appropriate file formats, and use reliable image editing software. Understanding how resizing affects pixels can help you avoid common mistakes and ensure your images remain sharp, professional, and visually appealing.
Whether you’re preparing images for social media, websites, marketing materials, or print projects, following the right resizing techniques will significantly improve the final result and prevent the frustration of blurry images.